Lollipop Camera is designed to monitor babys. For details regarding the product, visit https://www.lollipop.camera/ website. It is quite affordable, and working pretty well.
The camera itself has a very good picture quality in night-vision or daylight. It comes with a mobile app to configure and use it.
For fun and integration, I was looking for reverse engineering, and integrate it into my existing home automation setup (OpenHAB).
RTSP Flow
First good news: the camera supports and provides a direct RTSP flow! It is however not communicated officially. I discovered it by observing network traffic with Wireshark.
Only remark is that the address of the channel is not the same for all cameras, and has a variable part in the path:
rtsp://172.16.100.181:554/live/23a711d9d154733c4c432b959db25b09/ch00_0Good news – it was easy to reverse and understand how to get this URL part!
When the camera is associated with an account during the setup phase – it gets associated a unique identifier. If you unregister and re-pair your camera, this ID will change. The number in the path is a simple MD5 hash of this pairing ID.
To compute the MD5 hash, one can use the following command under a Unix-like system:
echo -n '<id>' | md5sumHow to obtain this ID ? 2 solutions.
First solution, use the cloud API and retrieve the list of devices associated with your account.
Second solution, use the MQTT embedded broker (see next paragraph).
Once you get this unique ID, just get the MD5 hash of it and use your favorite tool such as VLC to access the video live feed:

The video itself is standard h264 encoded, full HD (1080p) and 30fps. It also has audio (AAC).
MQTT Broker
The camera hosts an MQTT broker on typical 1883 TCP port. One remark here – it is using TLS on the 1883 port – but without any authentication (I therefore wonder the goal of using TLS if no authentication is required…).
To connect to the broker and observe the trafic, you can either use a tool such as MQTT Explorer or mosquitto_sub in CLI. Mosquitto is slightly more complex as it forces you to provide a certificate authority for TLS – even if you don’t care about validating the certificate (use of –insecure).
I recommend, if you want to go with Mosquitto, to use stunnel to remove TLS layer:
[mqtt]
client = yes
accept = 127.0.0.1:1883
connect = 172.16.100.181:1883
verifyChain = no
Then, start stunnel, and run mosquitto:
~ stunnel stunnel.conf
~ mosquitto_sub -h 127.0.0.1 -p 1883 -t '#'
{"method":"liveNote","result":{"motion":0.000000,"noise":26.137789,"ircut":1,"timestamp":1644060875}}
{"method":"liveNote","result":{"motion":0.000000,"noise":25.692110,"ircut":1,"timestamp":1644060877}}
{"method":"liveNote","result":{"motion":0.000000,"noise":26.108130,"ircut":1,"timestamp":1644060879}}
{"method":"liveNote","result":{"motion":0.000000,"noise":30.808922,"ircut":1,"timestamp":1644060881}}
{"method":"liveNote","result":{"motion":0.000000,"noise":30.426422,"ircut":1,"timestamp":1644060883}}
{"method":"liveNote","result":{"motion":0.000000,"noise":29.092848,"ircut":1,"timestamp":1644060885}}
{"method":"liveNote","result":{"motion":0.000000,"noise":24.882603,"ircut":1,"timestamp":1644060890}}
{"method":"liveNote","result":{"motion":0.000000,"noise":24.503872,"ircut":1,"timestamp":1644060892}}
{"method":"liveNote","result":{"motion":0.000000,"noise":28.854191,"ircut":1,"timestamp":1644060896}}
{"method":"liveNote","result":{"motion":0.000000,"noise":24.972601,"ircut":1,"timestamp":1644060898}}
{"method":"liveNote","result":{"motion":0.000000,"noise":25.041418,"ircut":1,"timestamp":1644060902}}
{"method":"liveNote","result":{"motion":0.000000,"noise":24.836710,"ircut":1,"timestamp":1644060904}}
{"method":"liveNote","result":{"motion":0.000000,"noise":25.788094,"ircut":1,"timestamp":1644060906}}
{"method":"liveNote","result":{"motion":0.000000,"noise":31.351727,"ircut":1,"timestamp":1644060908}}
{"method":"liveNote","result":{"motion":0.000000,"noise":25.534382,"ircut":1,"timestamp":1644060910}}
{"method":"liveNote","result":{"motion":0.000000,"noise":24.672976,"ircut":1,"timestamp":1644060912}}
{"method":"liveNote","result":{"motion":0.000000,"noise":24.879845,"ircut":1,"timestamp":1644060914}}
{"method":"liveNote","result":{"motion":0.000000,"noise":25.365896,"ircut":1,"timestamp":1644060916}}
{"method":"liveNote","result":{"motion":0.000000,"noise":31.724693,"ircut":1,"timestamp":1644060920}}
{"method":"liveNote","result":{"motion":0.000000,"noise":37.207649,"ircut":1,"timestamp":1644060922}}
{"method":"liveNote","result":{"motion":0.000000,"noise":31.941177,"ircut":1,"timestamp":1644060924}}
{"method":"liveNote","result":{"motion":0.000000,"noise":29.046495,"ircut":1,"timestamp":1644060926}}
{"method":"liveNote","result":{"motion":0.000000,"noise":25.750412,"ircut":1,"timestamp":1644060928}}
Or using a graphical tool such as MQTT Explorer:
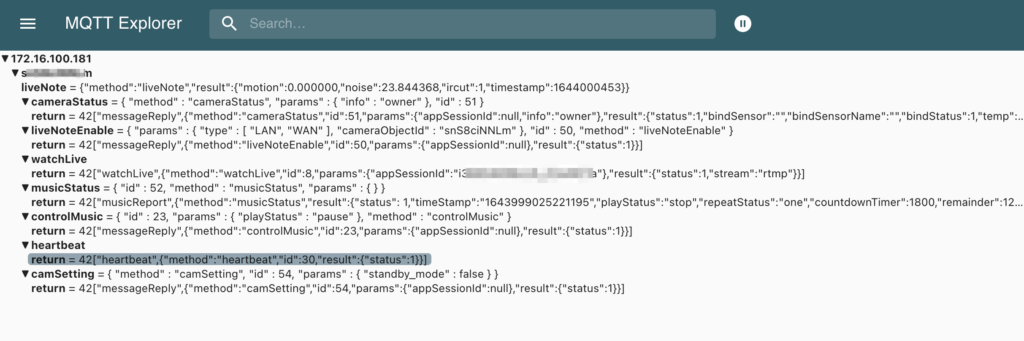
Topics
<camera registration ID>/liveNote
{
"method":"liveNote",
"result":{
"motion":0.000000,
"noise":26.714561,
"ircut":1,
"timestamp":1644054668
}
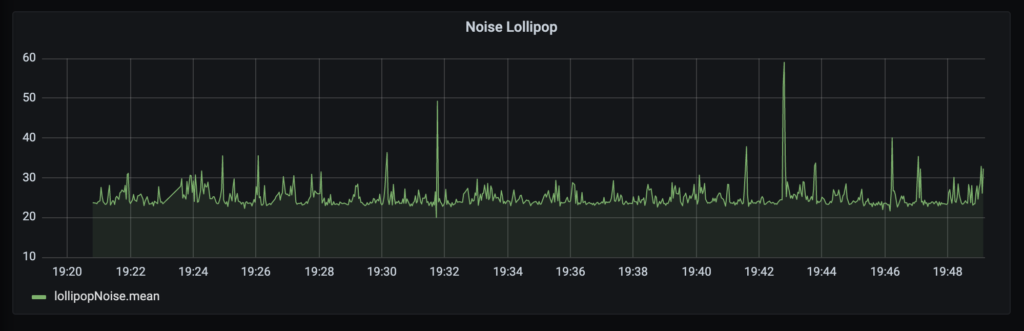
}Messages are frequently being sent (every 3 or 4 seconds). Value can for example be used in a Grafana panel:
<camera registration ID>/cameraStatus
<camera registration ID>/cameraStatus/return
<camera registration ID>/liveNoteEnable
<camera registration ID>/liveNoteEnable/return
<camera registration ID>/watchLive
<camera registration ID>/watchLive/return
<camera registration ID>/musicStatus
<camera registration ID>/musicStatus/return
<camera registration ID>/controlMusic
<camera registration ID>/controlMusic/return
<camera registration ID>/heartbeat/return
<camera registration ID>/camSettings
<camera registration ID>/camSettings/return
<camera registration ID>/prenotify
Messages on this channel are the notifications configured, such as noisy environment:
{
   "preNotify":true,
   "event_time":1644048361346.000000,
   "camera_id":"xxxxxxxx",
   "param":{
      "camera_name":"Lollipop",
      "baby_name":"My Baby",
      "event_params":[
         {
            "event_type":3,
            "threshold":80,
            "val":80.279999
         }
      ]
   }
}
event_type:
3: noisy environment. with this event type, val is the noise level in DB.
General thoughts
I liked the fact that the camera is relatively opened, allowing the integration in existing installation. However, it is kind of insecure: getting IP connectivity to the camera, no password nor credential is required to access the video (including sound), nor control the camera through the MQTT broker.
As such, my recommendation would remain as usual: do not expose them to the internet, and if possible put all your IoT devices on a separate VLAN / SSID, with relatively strong isolation with your main network/VLAN/SSID.