
The vendor was so kind to leave SSH installed on the build – DropBear – which is a common SSH daemon for embedded systems. We just need to enable it. If we look at runlevel 5 – SSH is disabled, and can easily be enabled, by simply renaming /etc/rc5.d/K06dropbear to /etc/rc5.d/S30dropbear.

No firewall port needs to be opened (simple NMAP test returns "port closed", and not "port filtered").
Last detail: there is no root password set! And a password (or a key) is necessary to login. Easier option: just alter /etc/shadow and replace:
root:*:18488:0:99999:7:::With:
root:$1$U5C8/RRe$jOaAuy.0o9R.eZOgHHYnI1:18488:0:99999:7:::Where $1$U5C8/RRe$jOaAuy.0o9R.eZOgHHYnI1 is Linux MD5 password hash for password “toor”.
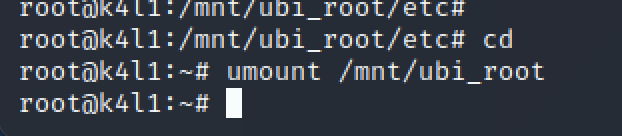
Now, umount the partition properly:
And dump the UBI root partition:

We know have a patched ROOT partition – and we need to flash-it back to the device. Because OpenOCD is not friendly – and it is always good to know multiple tools / options, we will use a different [advanced] technique to flash the Cozytouch, using a JLink probe.
Connect to the SoC using JLink
- Start JLink:
root@raspberrypi4:~# /opt/JLink_Linux_V680_arm/JLinkExe
SEGGER J-Link Commander V6.80 (Compiled May 25 2020 17:09:50)
DLL version V6.80, compiled May 25 2020 17:09:30

Connecting to J-Link via USB...O.K.
Firmware: J-Link Pro V4 compiled Apr 16 2020 17:18:17
Hardware version: V4.00
S/N: 174402560
License(s): RDI, FlashBP, FlashDL, JFlash, GDB
IP-Addr: DHCP (no addr. received yet)
VTref=3.337V


Type "connect" to establish a target connection, '?' for help
J-Link>
The next step is to configure properly your interface:
- Set the mode to JTAG:
J-Link>si 0
Selecting JTAG as current target interface.- Set the interface speed in adaptive mode (you can force a speed, but adaptative worked well)
J-Link>speed adaptive
Selecting adaptive clocking as target interface speed- Select the device type (SoC):
J-Link>device AT91SAM9G25And finally, let the probe automatically detect the JTAG position
J-Link>JTAGConf -1,-1Now that you are done with probe/tools configuration, let’s start the fun. Reset the device.
J-Link>r
Target connection not established yet but required for command.
Device "AT91SAM9G25" selected.


Connecting to target via JTAG
TotalIRLen = 4, IRPrint = 0x01
JTAG chain detection found 1 devices:
 #0 Id: 0x0792603F, IRLen: 04, ARM926EJ-S Core
CP15.0.0: 0x41069265: ARM, Architecture 5TEJ
CP15.0.1: 0x1D152152: ICache: 16kB (4*128*32), DCache: 16kB (4*128*32)
Cache type: Separate, Write-back, Format C (WT supported)
ARM9 identified.
Reset delay: 0 ms
Reset type NORMAL: Using RESET pin, halting CPU after Reset
CP15.0.0: 0x41069265: ARM, Architecture 5TEJ
CP15.0.1: 0x1D152152: ICache: 16kB (4*128*32), DCache: 16kB (4*128*32)
Cache type: Separate, Write-back, Format C (WT supported)
J-Link>
The Cozytouch is now instrumentable through JTag, with instruction pointer at address 0x00000000, and in halted state.
Understand the AT91 boot Sequence
From JLink, you can’t directly flash the NAND. NAND are not directly addressed in the CPU address space and need some drivers (as explained earlier when dumping).
It is mandatory to understand the AT91 boot sequence before moving forward.

According to the documentation, the AT91SAM9G25 comes with SAM-BA, a boot-rom program. I managed to boot in SAM-BA mode, instrumenting and hijacking the boot sequence, but SAM-BA is not able to deal with NAND flash. It requires additional drivers which are not directly addressable with SAM-BA.
We want to boot to a well-known tool – U-Boot. It allows to manipulate the device, including dumping/flashing NAND. We cannot directly boot in U-Boot and must follow the vendor boot sequence. We will have to find & compile the AT91BootStrap & U-Boot.
As mentioned in the doc, the goal of the ROM code is to load the bootstrap from the 64k internal memory of the chip. We don’t need a complex bootstrap: we just want it to load NAND flash drivers, and pass it to the next stage (U-Boot).
As we don’t want to brick the device, we’ll not flash the NAND with our bootstrap and uboot, but just hijack the boot, copying it in live memory (RAM) with JTAG probe.
Download the bootstrap from official GIT repo:
https://github.com/linux4sam/at91bootstrap
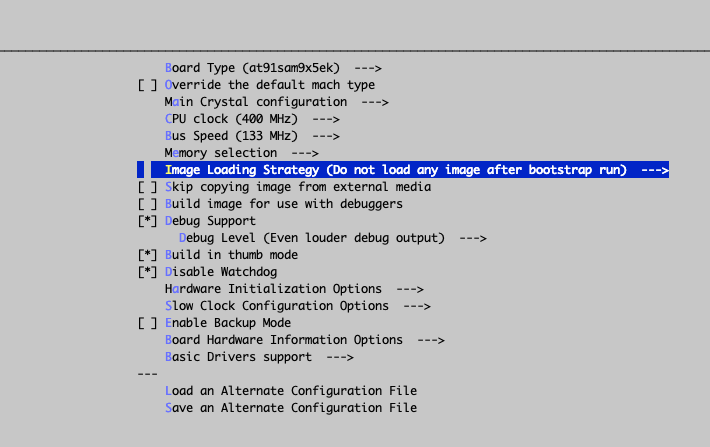
That being done, enter in the configuration options for the bootstrap:
make menuconfigThis will let you configure your perfect bootstrap. For me, the perfect bootstrap does… NOTHING: Image loading strategy -> do not load any image after bootstrap run.
Remember: the goal is not to take this board and run your own linux on it, but just to jailbreak it. At this stage, I’m just trying to figure how it works, and how is it made of.
Once compiled, I obtained the following files:

We must now load this bootstrap. Easy.
First, we set a breackpoint at @0: As written in the documentation, once the ROM Code execution is done, it will execute the bootstrap which will be remapped at address 0. We will then set a breakpoint before executing the Bootstrap, write in the RAM the boostrap, then execute it:
J-Link>setbp 0 A
Breakpoint set @ addr 0x00000001 (Handle = 0)
J-Link>g
If you have the serial console plugged, you’ll see that the ROMCode as successfullly been executed:

ROM Code execution trace
The execution is now stopped at address 0, and the code at address 0 is the bootstrap provided by the Cozytouch vendor. Let’s overwrite it by our freshly compiled bootstrap:
J-Link>loadbin /data/cozytouch/files/at91sam9x5ek-nandflashboot-none-3.9.2-rc1.bin 0x0
 Downloading file [/data/cozytouch/files/at91sam9x5ek-nandflashboot-none-3.9.2-rc1.bin]…
 O.K.
If you now decide to resume the execution (g command – for “go”) – you will execute our bootstrap.

As the bootstrap mentions: we can now load application via JTAG. Yeah.
Similarly to the bootstrap, we will now build uBoot. Nothing complex, it’s all on GIT! Follow the doc, and let’s meet at next step!
https://github.com/linux4sam/u-boot-at91
Once you have managed to compile UBOOT..
Your AT91 SoC is now in a waiting state, with most drivers initialized, ready to move to second stage boot loading (Uboot).
Let’s copy the UBOOT executable code in the RAM – somewhere in the free memory (read the SoC documentation about RAM organization). Then, redirect the execution pointer at this address, and continue execution:
J-Link>loadbin /data/cozytouch/files/u-boot.bin 0x26f00000
Halting CPU for downloading file.
Downloading file [/data/cozytouch/files/u-boot.bin]...
O.K.
J-Link>setpc 0x26f00000
J-Link>g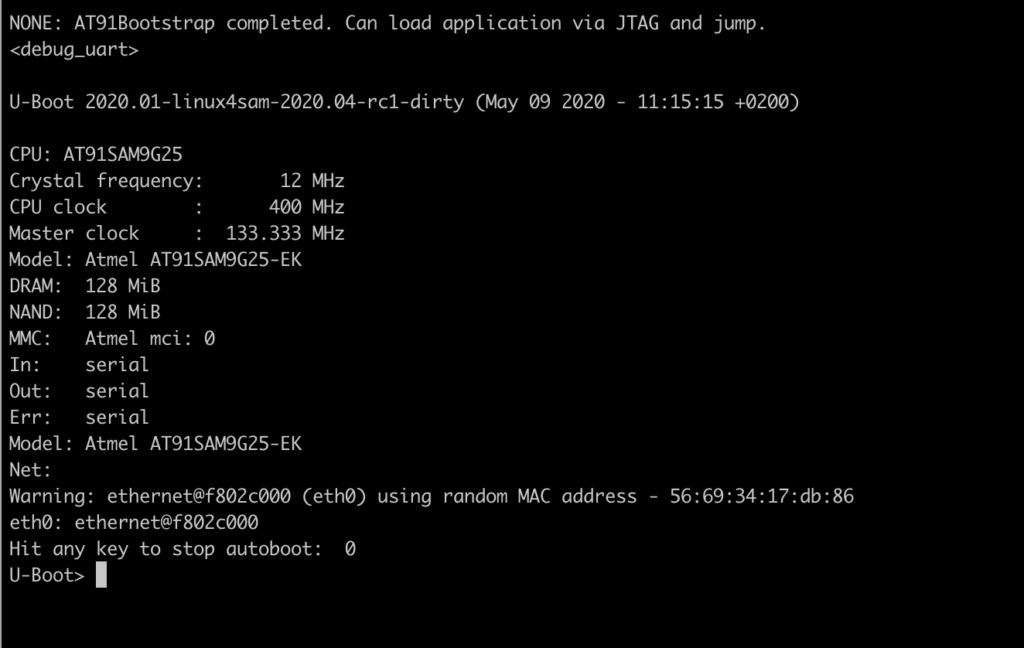
Welcome to U-Boot!
To confirm all our previous assumptions – we can for example list partitions:
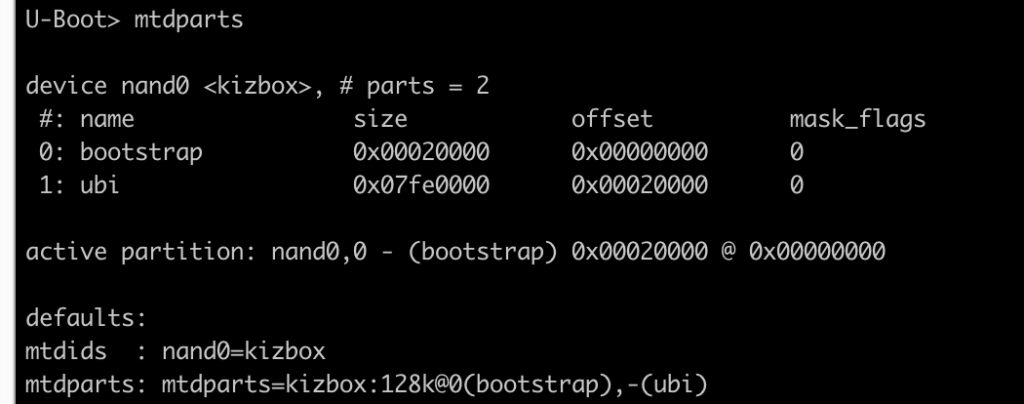
Now mount the 2nd partition as UBI:
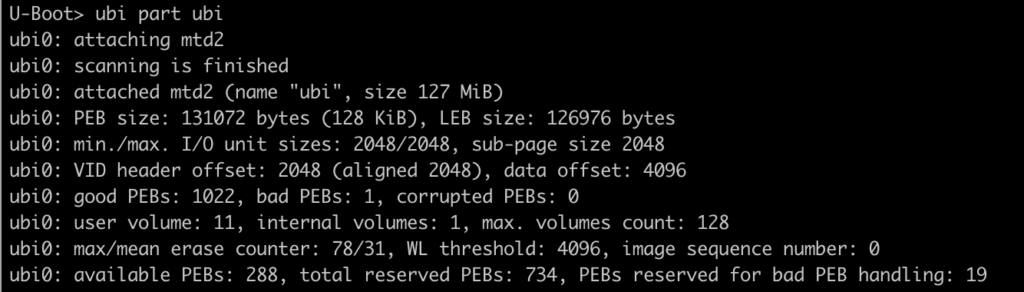
And finally, you can list all UBI partitions to confirm partition scheme discovered from the dump.
Flash the patched ROOT partition
Now that we have a working U-Boot and patched the ROOT partition, we want to flash it to the NAND, and check that we correctly rooted our device.
Install a TFTP daemon on your machine, as it will make your life easier to flash the Cozytouch with Uboot.
Once you have copied your file on the TFTP, load the new UBIFS for ROOT partition into memory:

Reboot the device (dont forget you have a breakpoint set with JLink! So if you don’t remove the BP nor hit “g”, the device won’t boot and wait for ages at PC 0x0).
After couple of seconds – I assume you know how to find your Cozytouch on your LAN… And you can try SSH on it as root:
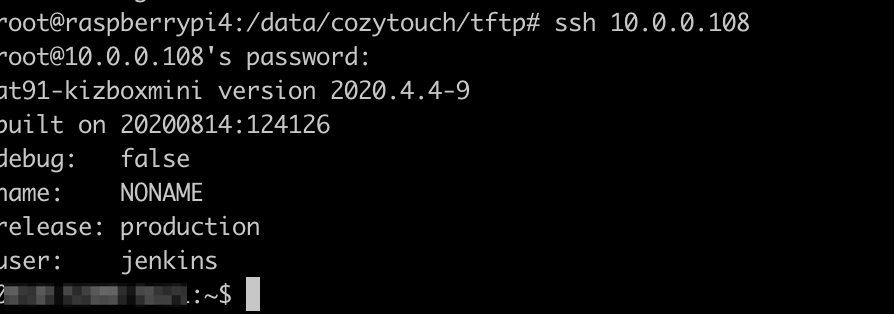
Congratulations! You are now logged in as root on your Cozytouch !
After couple of days – I realized that the device was unrooted and SSH was not accessible anymore. I believe that the device has a watchdog routine, comparing the fingerprint/hash of the partition/firmware with an expected one. At the time of writing this article – I have not yet sorted out this “problem”.