Recently, one of my EdgeRouter – an ER6P – got bricked, without any reason. It was working fine and all of a sudden stopped working.
Using the serial console, the router was in a bootloop – failing to start.
SPI stage 1 bootloader
SPI ID: c2:20:17:c2:20
header found at offset 0x2000
Image 1.2: address: 0xffffffffc0000000, header length: 192, data length: 359416
Validating data...
Corrupted bootloader
Could not start next bootloader
...
At this stage, it was not possible to interract with the router, nor to follow any guide from ubiquiti to fix by doing TFTP recovery etc.
In order to repair the router, it is important to understand its architecture. The architecture I’m going to describe is valid for Cavium chip based devices, so at least ER6P, ER12, and probably ER4.
The router is composed of a SOC, the Cavium and a 4GB flash memory which contains the firmware. The SOC is not able to boot on a flash memory, as it requires some drivers, and a piece of software, that is not natively included in the SOC. For this reason, there is an additional memory composant: SPI flash. SPI – for serial peripheral interface – is slower than parallel flashes, but is a simple protocol that is supported by the SOC.
The role of this SPI flash (which is small – 64 mbits) is just to host the bootloaders. Yes, with a final “S”, because it is a multi-stage boot ! Another role of this SPI flash is to emulate an eeprom to store some settings, such as the serial number of the router, its MAC addresses…
The SPI flash is splitted into 3 partitions, and some free/unused space.
Here is the layout of this SPI memory:
boot0 and boot1 are not a failover that could be used in case of faulty upgrade or so – as it is sometimes seen, but as 2 levels of boot. The router first boots the boot0, then the boot1. Interestingly, both bootloaders seems to rely on UBoot, but the first one has far less modules/features integrated. For example, if boot1 is corrupted, you can obtain a shell in boot0, but it will not come with tftp server/clients compiled in etc.
In my case, both boot0 and boot1 got corrupted ! As such, I did not get any console access to the router, leaving me with 1 single remaining option: the hard way (“try harder”).
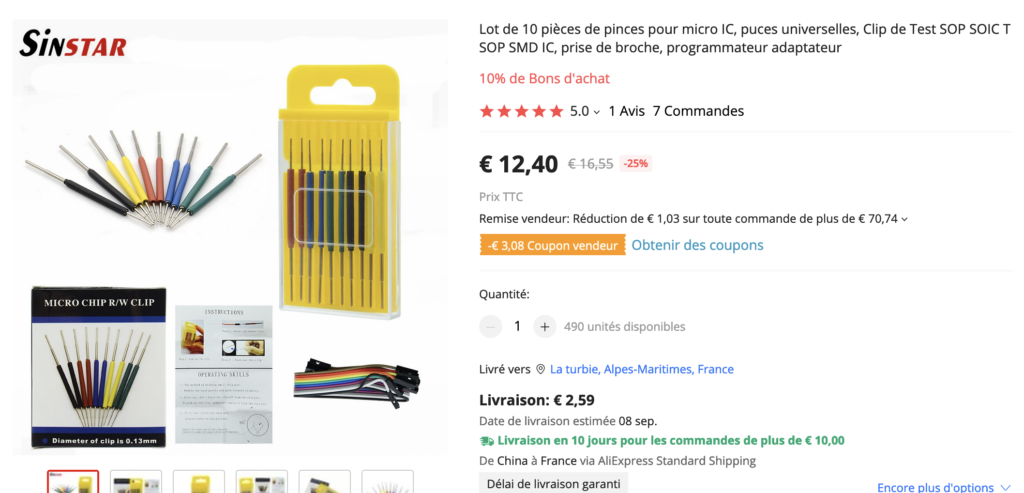
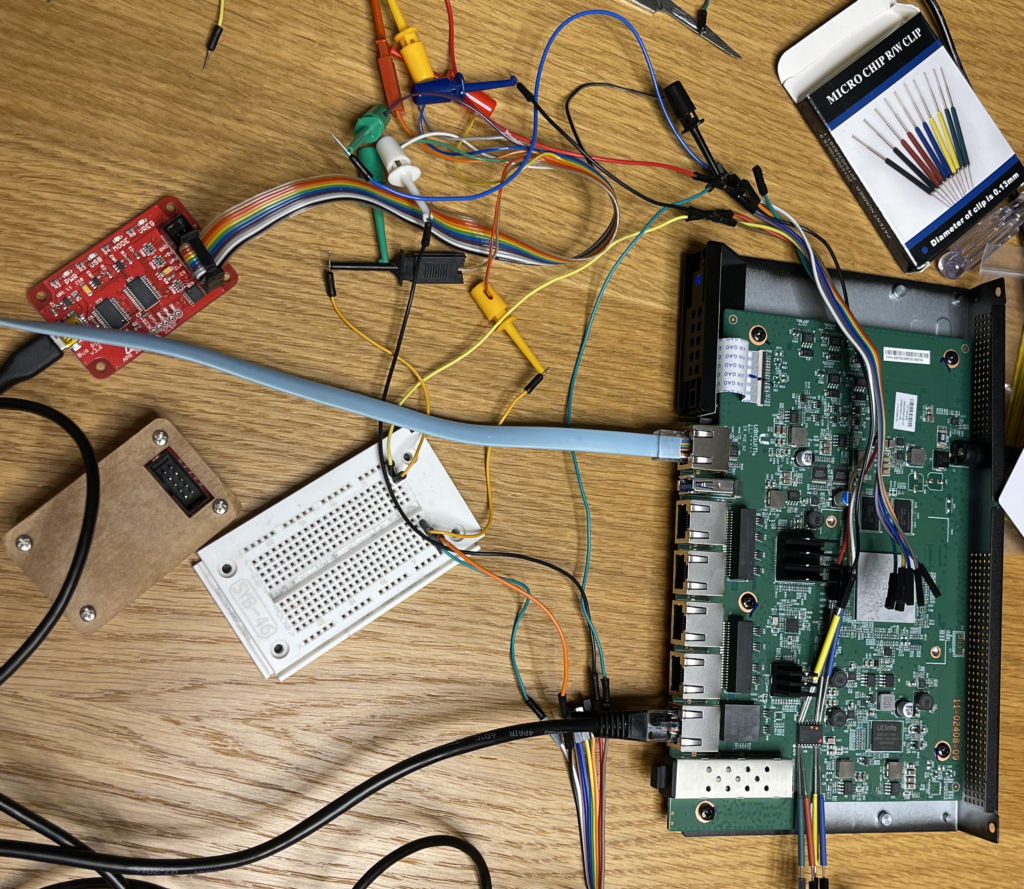
The hard way – in my case – was pretty simple: accessing the SPI flash in order to dump & flash it. I used my old good BusPirate friend, with Flashrom. Luckily, I did not have to unsolder the chip from the board to get it working.
I recommend using precision clamps / micro clamps that can be found on Aliexpress for example for few bucks.
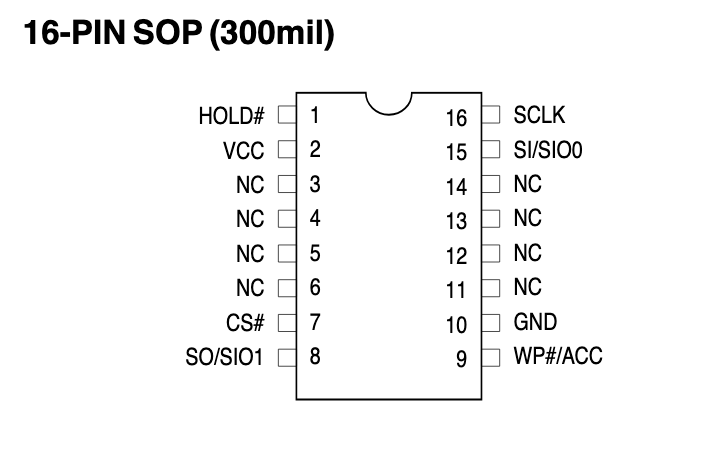
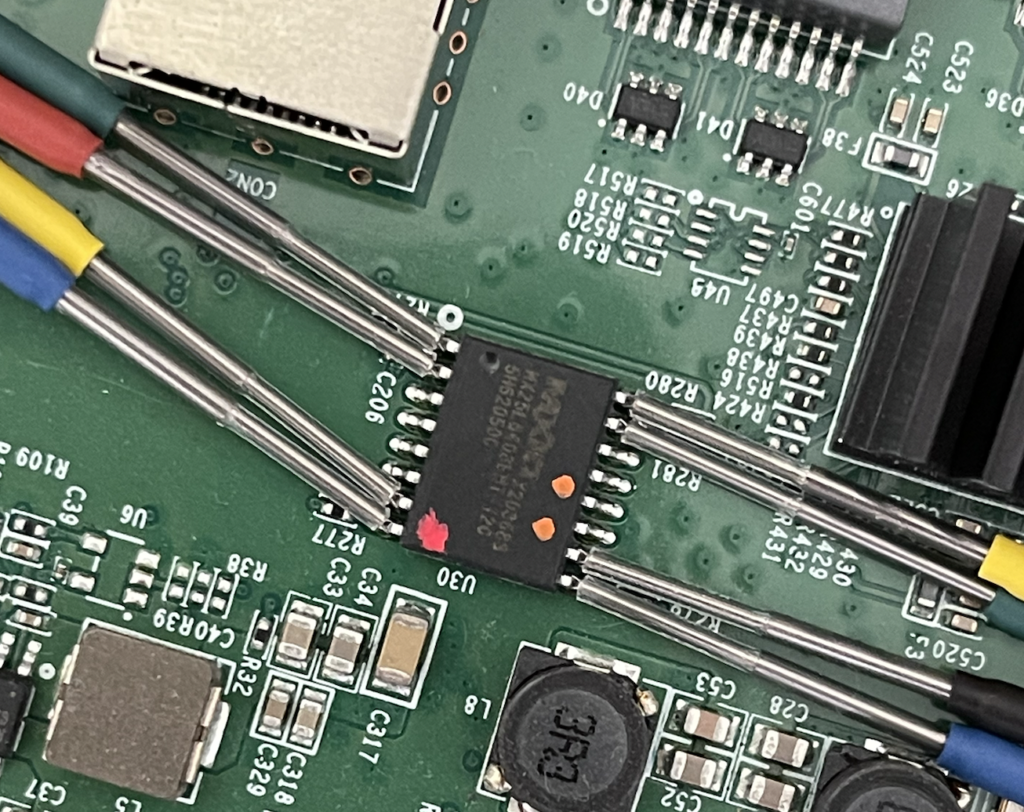
After having read carefuly the SPI datasheet (mx25l6405d), the pinout is obtained and can be connected to the buspirate.
Now that the pinout is known, just connect the correct buspirate probes to the SPI flash.
As you have to entirely re-write the flash – the first thing to do before anything else is to backup its content. Even if the bootloader is corrupted, the EEPROM partition might still be OK.
The previous command backups the content of the SPI flash to a file named backup-spi.bin. Note that I specified the chip type, to use correct SPI function codes.
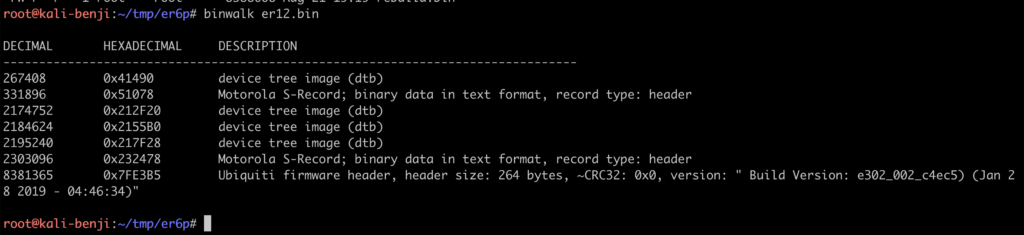
You now have the content of your flash. On a working router (the example below is with an ER12 SPI dump), it should looks like that:
As I said, there are 2 levels of bootloader, 0 and 1. If the bootloader 1 is corrupted, you can find its content in a firmware image from Ubiquiti, after extracting the squashfs image, in the root FS/etc/ubnt/bootloader.
The problem remains with bootloader 0: Ubiquiti does not provide its content – as the only way to re-flash it is to go with hardware probes.
At this stage, I only had an ER12 as a bootloader donor for my corrupted ER6P. As they both rely on Cavium SOC, I decided to give it a try to copy the ER12 bootloader to the ER6P. And it worked ! Well… the router booted, but it feeled like an ER12 instead of an ER6P. The ethernet ports were not correctly labelled, the LEDs were not correctly working etc. It was better than a brick, but not perfect. I still needed an ER6 dump.
I forgot to mention that to get a dump from a working router – there is an easier way than going with the buspirate : just use dd with /dev/boot0 / boot1 / eeprom.
Dumping from a working router:
dd if=/dev/boot0 of=/tmp/boot0.bin
Luckily, I found a working ER6 with a friend and could dump the bootloader 0. In case it could help other users – I decided to share them on github : https://github.com/blafois/edgerouter-spi-repair
Now, last step : before flashing back and bring back to life your router – you need to recompose the flash image. Remember the flash layout I presented earlier. You just need to keep your eeprom. Consider that your original dump is “backup-corrupted.bin”, and you get the dumps from “boot0.bin” and “boot1.bin”.
cat boot0.bin boot1.bin > repair-img.bin
# extract the eeprom from your backup - which resides in memory from 0040 0000 and 0041 0000
dd if=backup-corrupted.bin of=eeprom.bin bs=1 count=65536 skip=262144
cat eeprom.bin >> repair-img.bin
# now, just pad the image with some 0 (free space)
dd if=/dev/zero of=zeros.bin bs=1 count=4128768
cat zeros.bin >> repair-img.bin
# flash back image
flashrom -p buspirate_spi:dev=/dev/ttyUSB0 -w repair-img.bin -c MX25L6406E/MX25L6408E -V
At this stage, your router should be back to life 🙂
Edit: following comments from Cesar – here is the pinout for the Buspirate connection:
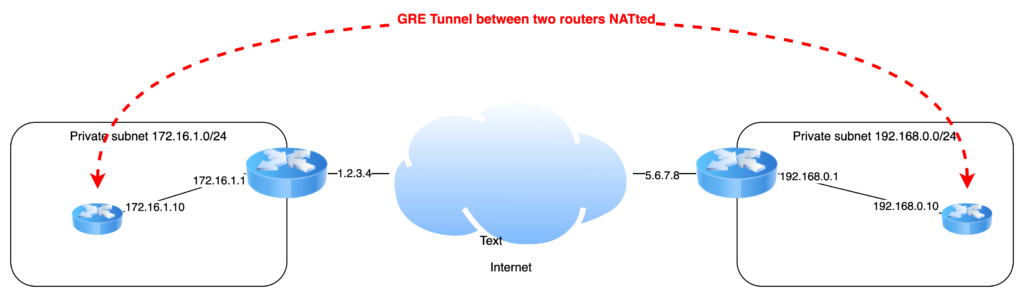
This article describes the configuration of a GRE tunnel between 2 routers that sit on a private network.
Use Case
What is the use case for such a “complex” setup ? The most obvious use case is the need/desire to establish a tunnel between 2 private networks, while the default gateways do not allow such technologies (such as ISP modem/routers).
Warning: GRE does not perform any kind of encryption. All data transmitted over the GRE tunnel will be in clear-text over the internet. As such, security/confidentiality is only handled by layer7 protocols (SSL, SSH…).
Design
For the sake of the example, the 2 private network addresses are 172.16.1.0/24 and 192.168.0.0/24.
This exercise is done using Vyos virtual appliances.
Setup NAT on the public internet routers / gateways
Sitting on a private network, the GRE endpoints must be reachable from the internet. This includes port forwarding and firewall opening.
Example on the LEFT gateway, using Ubiquiti router (Vyatta):
firewall {
  name internet-to-lan {
    default-action drop
    rule 1 {
      action accept
      description GRE
      destination {
        address 172.16.1.10
      }
      protocol gre
    }
  }
}
...
service {
  nat {
    rule 1 {
      description GRE
      inbound-interface <public interface>
      inside-address {
        address 172.16.1.10
      }
      protocol gre
      type destination
    }
  }
}
Setup GRE tunnel on a virtual appliance on a private network
interfaces {
  ethernet eth0 {
    address 172.16.1.10/24
    description LAN
  }
  tunnel tun0 {
    description GRE
    address 10.0.0.1/30
    encapsulation gre
    /* The public IP address of the remote endpoint */
    remote 5.6.7.8
    /* The private IP address of the local router - same as eth0 */
    source-address 172.16.1.10
  }
}
The same configuration should be done on the remote side / router.
Warning: GRE is a stateless protocol, there is no session establishment, and as such, the status cannot be checked showing as CONNECTED or ERROR. You must just try to ping the remote side
Warning2: if you are using firewalling on the GRE router, you must ensure that proper rules are in place on interfaces tun0 to allow traffic you want to allow.
Now, you have a working GRE tunnel. If you want to route the traffic from the local network to both networks, you need to add static routes, both in the GRE router and in the default gateway on your network.
Lollipop Camera is designed to monitor babys. For details regarding the product, visit https://www.lollipop.camera/ website. It is quite affordable, and working pretty well.
The camera itself has a very good picture quality in night-vision or daylight. It comes with a mobile app to configure and use it.
For fun and integration, I was looking for reverse engineering, and integrate it into my existing home automation setup (OpenHAB).
RTSP Flow
First good news: the camera supports and provides a direct RTSP flow! It is however not communicated officially. I discovered it by observing network traffic with Wireshark.
Only remark is that the address of the channel is not the same for all cameras, and has a variable part in the path:
Good news – it was easy to reverse and understand how to get this URL part!
When the camera is associated with an account during the setup phase – it gets associated a unique identifier. If you unregister and re-pair your camera, this ID will change. The number in the path is a simple MD5 hash of this pairing ID.
To compute the MD5 hash, one can use the following command under a Unix-like system:
echo -n '<id>' | md5sum
How to obtain this ID ? 2 solutions.
First solution, use the cloud API and retrieve the list of devices associated with your account.
Second solution, use the MQTT embedded broker (see next paragraph).
Once you get this unique ID, just get the MD5 hash of it and use your favorite tool such as VLC to access the video live feed:
The video itself is standard h264 encoded, full HD (1080p) and 30fps. It also has audio (AAC).
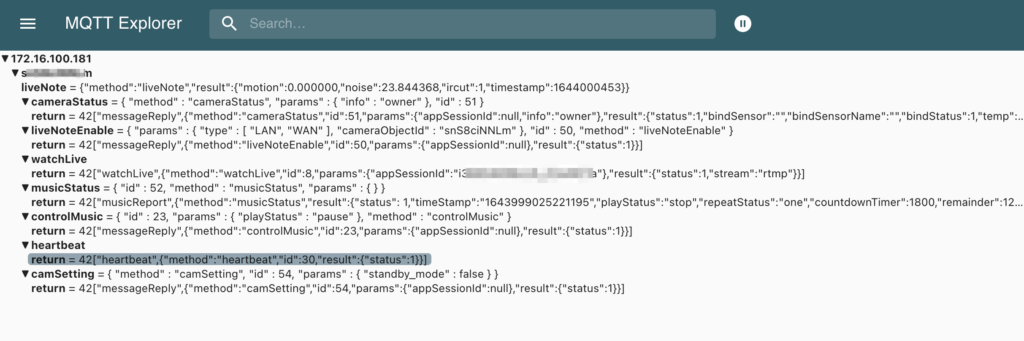
MQTT Broker
The camera hosts an MQTT broker on typical 1883 TCP port. One remark here – it is using TLS on the 1883 port – but without any authentication (I therefore wonder the goal of using TLS if no authentication is required…).
To connect to the broker and observe the trafic, you can either use a tool such as MQTT Explorer or mosquitto_sub in CLI. Mosquitto is slightly more complex as it forces you to provide a certificate authority for TLS – even if you don’t care about validating the certificate (use of –insecure).
I recommend, if you want to go with Mosquitto, to use stunnel to remove TLS layer:
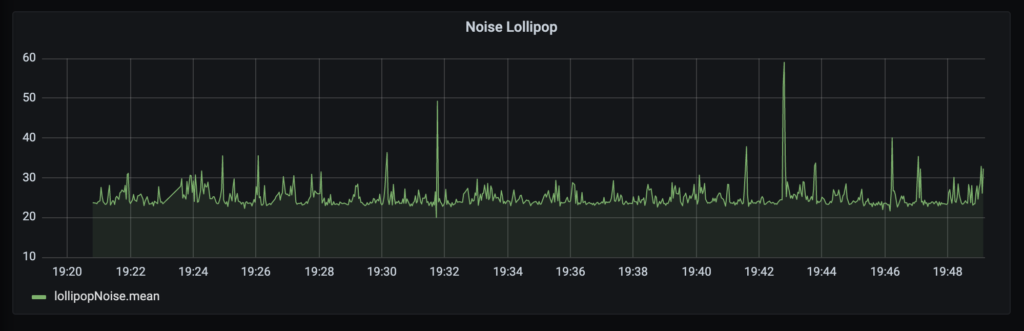
event_type: 3: noisy environment. with this event type, val is the noise level in DB.
General thoughts
I liked the fact that the camera is relatively opened, allowing the integration in existing installation. However, it is kind of insecure: getting IP connectivity to the camera, no password nor credential is required to access the video (including sound), nor control the camera through the MQTT broker.
As such, my recommendation would remain as usual: do not expose them to the internet, and if possible put all your IoT devices on a separate VLAN / SSID, with relatively strong isolation with your main network/VLAN/SSID.
My French ISP (Orange) uses DHCP messages with a CoS Priority of 6, otherwise they are not processed. So in order to avoid using the set top box provided by him, you can use an OpenWRT router which comes with UDHCP (part of Busybox).
Here is a small patch to support this.
$(busybox)/networking/udhcp/dhcpc.c
In function udhcp_raw_socket(int ifindex), line 1086:
+       /* Set Kernel Priority to 6 */
+       int val = 6;
+       setsockopt(fd, SOL_SOCKET, SO_PRIORITY, &val, sizeof(val));

        if (setsockopt_1(fd, SOL_PACKET, PACKET_AUXDATA) != 0) {
                if (errno != ENOPROTOOPT)
                        log1s("can't set PACKET_AUXDATA on raw socket");
        }
$(busybox)/networking/udhcp/packet.c
In function udhcp_send_raw_packet, line 123:
+       /* Set Kernel Priority to 6 */
+       int val = 6;
+       setsockopt(fd, SOL_SOCKET, SO_PRIORITY, &val, sizeof(val));
+       bb_info_msg("Packet priority set to %s", "6");

        memset(&dest_sll, 0, sizeof(dest_sll));
        memset(&packet, 0, offsetof(struct ip_udp_dhcp_packet, data));
        packet.data = *dhcp_pkt; /* struct copy */
In function udhcp_send_kernel_packet, line 213:
+       /* Set Kernel Priority to 6 */
+       int val = 6;
+       setsockopt(fd, SOL_SOCKET, SO_PRIORITY, &val, sizeof(val));

        /* If interface carrier goes down, unless we
         * bind socket to a particular netdev, the packet
         * can go out through another interface, eg. via
         * default route despite being bound to a specific
         * source IP. As such, bind to device hard and fail
         * otherwise. Sending renewal packets on foreign
         * interfaces makes no sense.
         */
        if (ifname) {
This article will mainly target people located in France, but who knows 🙂
Orange, a French ISP, provides FTTH with up to 2GB downling/600mbps uplink, but the usage (and rental…) of their set top box (aka Livebox) is mandatory.
As I’m using my own router (Ubiquiti EdgeRouter), the Livebox is useless to me, just taking some place and energy :-). The goal of this article is to explain how to remove it to use a router instead.
The Livebox 5 integrates an ONT. So in order to remove the LB5, I needed to find an external ONT. A friend gave me an “old” Huawei HG8010H, which is the one Orange used to provide with older Livebox versions.
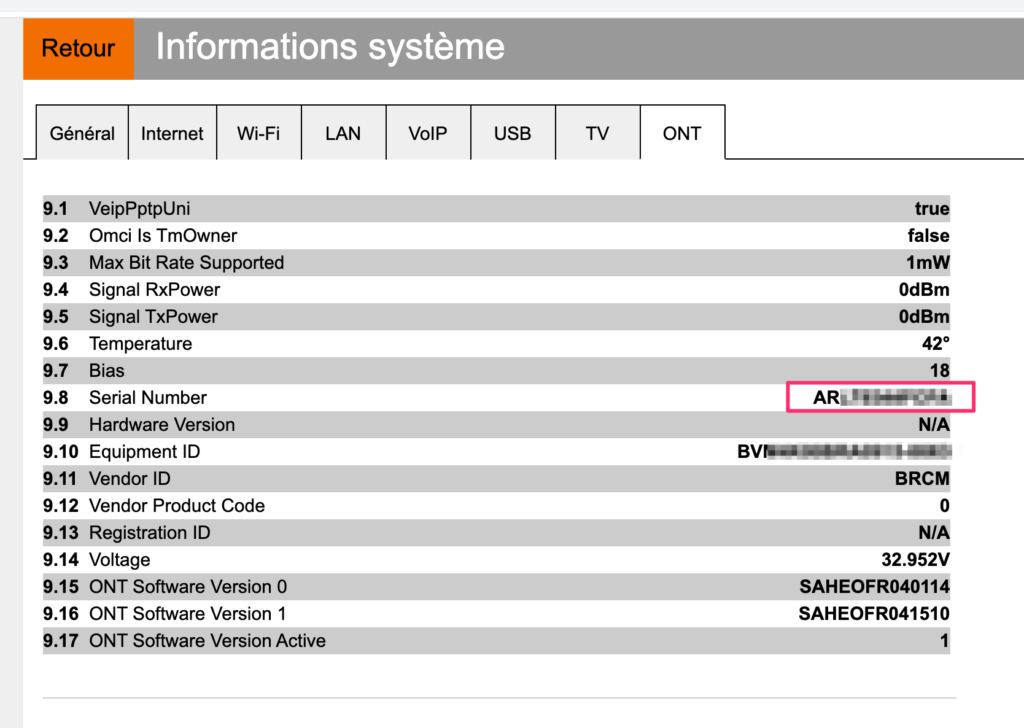
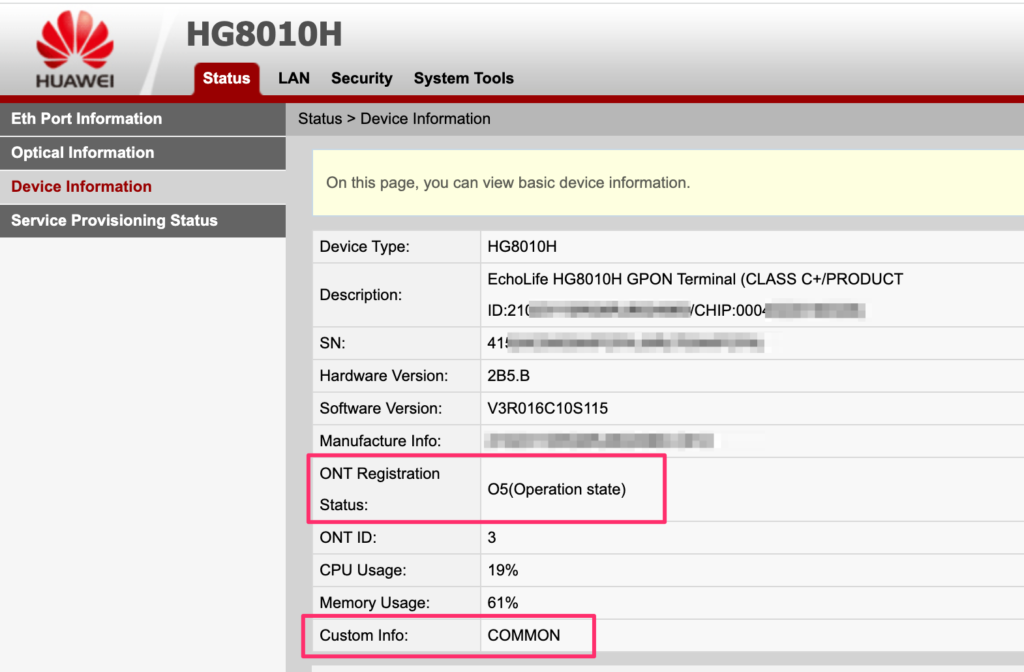
The first thing to do is to gate the ONT accepted on the optical network, commonly know as O5 state (“operation state” – https://www.mdpi.com/2076-3417/8/10/1934/pdf). To reach this state, the ONT must authenticate itself on the carrier network. Orange used to rely on the SLID (subscriber line ID), but this is no longer used. It now only relies on the serial number of the ONT. It means that is necessary to change the Serial Number of the new ONT by the allowed one (the Livebox). Getting the “allowed” SN is easy: just go on the Livebox administration page:
Getting the Serial Number of the ONT from Livebox 5
Setting the same SN in the new ONT is possible if the ONT is not in the ISP locked mode. I will not cover how to unlock an Orange-provided HG8010 ONT, this can be found on the web with keyboard “restorehwmode.sh” !
Once the Serial Number is changed on the ONT to simulate the Livebox, the fiber link should come up in O5 mode::
Now that the fiber link is up – the router must be configured to access.
Orange is using multiple VLANs (internet, TV, SIP…). I will just be covering the Internet access as I’m not using TV nor phone.
For Internet, the VLAN 832 should be used, using DHCP and the “option 90”, which is used to authenticate the subscriber.
The tricky detail is the following: DHCP packets should be sent with a VLAN priority set to 6 ! Without doing that, device won’t be able to authenticate to the network.
Before configuring the router, several things will be needed, such as the Mac Address of the Livebox and the authentication data. This can be calculated using a JavaScript tool, using the username & password provided by Orange (famous “fti/xxxx”). I chose a different option, which consists in gathering those information from the Livebox.
Feel free to use this simple Python script to obtain the information and generate the configuration for your EdgeRouter:
Last problem: the VLAN Priority 6. The router uses ISC-DHCP as DHCP client, which relies on raw sockets. As such, it bypasses the “egress policy” you could define on the router.
The only solution is to patch & recompile the ISC-DHCP to hardcode the VLAN priority.
Patching and re-compiling ISC-DHCP
The easiest option is to use Docker! First of all, retrieve the package from Ubiquiti matching your router firmware version:
This archive includes all the package we need to recompile: edgeos-vyatta-dhcp.
Instanciate a Docker as follows:
docker run --rm -it debian:9.13 /bin/bash
Install necessary cross compilation toolchain:
apt-get update && apt-get install -y crossbuild-essential-mipsel vim
mkdir /data && cd /data
Copy the vyatta-dhcp3_4.1-ESV-R15-ubnt1+t5402460.dev.stretch.v2.0.9.24c30f9.tar.gz file to the /data in your docker:
For the version isc-dhclient-4.1-ESV-R15-P1, my patch file is:
--- a/common/discover.c
+++ b/common/discover.c
@@ -247,10 +247,6 @@ begin_iface_scan(struct iface_conf_list *ifaces) {
                log_error("Error creating socket to list interfaces; %m");
                return 0;
        }
-
-       /* Set Kernel Priority to 6 */
-       int val = 6;
-       setsockopt(ifaces->sock, SOL_SOCKET, SO_PRIORITY, &val, sizeof(val));

        memset(&lifnum, 0, sizeof(lifnum));
 #ifdef ISC_PLATFORM_HAVELIFNUM
diff --git a/common/icmp.c b/common/icmp.c
index ca857e0..6f97f67 100644
--- a/common/icmp.c
+++ b/common/icmp.c
@@ -95,10 +95,6 @@ void icmp_startup (routep, handler)
                        return;
                }

-               /* Set Kernel Priority to 6 */
-               int val = 6;
-               setsockopt(icmp_state -> socket, SOL_SOCKET, SO_PRIORITY, &val, sizeof(val));
-
 #if defined (HAVE_SETFD)
                if (fcntl (icmp_state -> socket, F_SETFD, 1) < 0)
                        log_error ("Can't set close-on-exec on icmp: %m");
diff --git a/common/lpf.c b/common/lpf.c
index 8111f38..fcf7db1 100644
--- a/common/lpf.c
+++ b/common/lpf.c
@@ -89,10 +89,6 @@ int if_register_lpf (info)
                log_fatal ("Open a socket for LPF: %m");
        }

-       /* Set Kernel Priority to 6 */
-       int val = 6;
-       setsockopt(sock, SOL_SOCKET, SO_PRIORITY, &val, sizeof(val));
-
        memset (&ifr, 0, sizeof ifr);
        strncpy (ifr.ifr_name, (const char *)info -> ifp, sizeof ifr.ifr_name);
        ifr.ifr_name[IFNAMSIZ-1] = '\0';
@@ -499,10 +495,6 @@ get_hw_addr(const char *name, struct hardware *hw) {
                log_fatal("Can't create socket for \"%s\": %m", name);
        }

-       /* Set Kernel Priority to 6 */
-       int val = 6;
-       setsockopt(sock, SOL_SOCKET, SO_PRIORITY, &val, sizeof(val));
-
        memset(&tmp, 0, sizeof(tmp));
        strcpy(tmp.ifr_name, name);
        if (ioctl(sock, SIOCGIFHWADDR, &tmp) < 0) {
diff --git a/common/raw.c b/common/raw.c
index b588f1b..a15f8ee 100644
--- a/common/raw.c
+++ b/common/raw.c
@@ -66,10 +66,6 @@ void if_register_send (info)
        if ((sock = socket (AF_INET, SOCK_RAW, IPPROTO_RAW)) < 0)
                log_fatal ("Can't create dhcp socket: %m");

-       /* Set Kernel Priority to 6 */
-       int val = 6;
-       setsockopt(sock, SOL_SOCKET, SO_PRIORITY, &val, sizeof(val));
-
        /* Set the BROADCAST option so that we can broadcast DHCP responses. */
        flag = 1;
        if (setsockopt (sock, SOL_SOCKET, SO_BROADCAST,
diff --git a/common/socket.c b/common/socket.c
index 8f94a63..3fe3d09 100644
--- a/common/socket.c
+++ b/common/socket.c
@@ -189,10 +189,6 @@ if_register_socket(struct interface_info *info, int family,
                log_fatal("Can't create dhcp socket: %m");
        }

-       /* Set Kernel Priority to 6 */
-       int val = 6;
-       setsockopt(sock, SOL_SOCKET, SO_PRIORITY, &val, sizeof(val));
-
        /* Set the REUSEADDR option so that we don't fail to start if
           we're being restarted. */
        flag = 1;
@@ -1178,10 +1174,6 @@ get_hw_addr(const char *name, struct hardware *hw) {
        }

  flag_check:
-       /* Set Kernel Priority to 6 */
-       int val = 6;
-       setsockopt(sock, SOL_SOCKET, SO_PRIORITY, &val, sizeof(val));
-
        if (lifr.lifr_flags & (IFF_VIRTUAL|IFF_IPMP)) {
                hw->hlen = sizeof (hw->hbuf);
                srandom((long)gethrtime());
Finally, recompile DHCLIENT.
cd /data/edgeos-vyatta-dhcp
make -f debian/rules configure
CC=mipsel-linux-gnu-gcc CPP=mipsel-linux-gnu-cpp ./configure --host=mipsel-linux-gnu --cache-file=config.cache
make