
This article describes the configuration of a GRE tunnel between 2 routers that sit on a private network.
Use Case
What is the use case for such a “complex” setup ? The most obvious use case is the need/desire to establish a tunnel between 2 private networks, while the default gateways do not allow such technologies (such as ISP modem/routers).
Warning: GRE does not perform any kind of encryption. All data transmitted over the GRE tunnel will be in clear-text over the internet. As such, security/confidentiality is only handled by layer7 protocols (SSL, SSH…).
Design
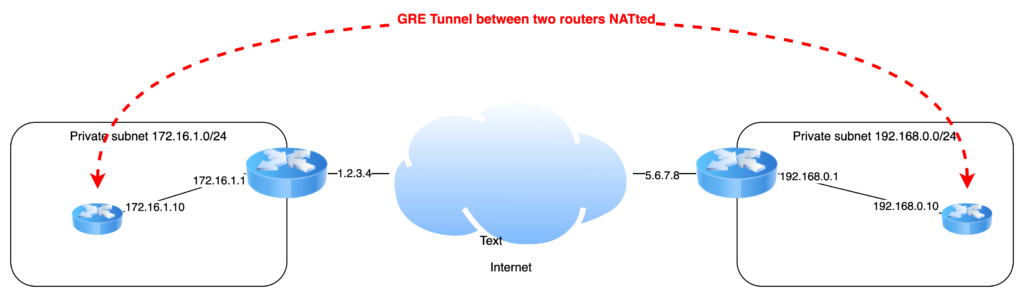
For the sake of the example, the 2 private network addresses are 172.16.1.0/24 and 192.168.0.0/24.
This exercise is done using Vyos virtual appliances.
Setup NAT on the public internet routers / gateways
Sitting on a private network, the GRE endpoints must be reachable from the internet. This includes port forwarding and firewall opening.
Example on the LEFT gateway, using Ubiquiti router (Vyatta):
firewall {
  name internet-to-lan {
    default-action drop
    rule 1 {
      action accept
      description GRE
      destination {
        address 172.16.1.10
      }
      protocol gre
    }
  }
}
...
service {
  nat {
    rule 1 {
      description GRE
      inbound-interface <public interface>
      inside-address {
        address 172.16.1.10
      }
      protocol gre
      type destination
    }
  }
}
Setup GRE tunnel on a virtual appliance on a private network
interfaces {
  ethernet eth0 {
    address 172.16.1.10/24
    description LAN
  }
  tunnel tun0 {
    description GRE
    address 10.0.0.1/30
    encapsulation gre
    /* The public IP address of the remote endpoint */
    remote 5.6.7.8
    /* The private IP address of the local router - same as eth0 */
    source-address 172.16.1.10
  }
}
The same configuration should be done on the remote side / router.
Warning: GRE is a stateless protocol, there is no session establishment, and as such, the status cannot be checked showing as CONNECTED or ERROR. You must just try to ping the remote side
Warning2: if you are using firewalling on the GRE router, you must ensure that proper rules are in place on interfaces tun0 to allow traffic you want to allow.
Now, you have a working GRE tunnel. If you want to route the traffic from the local network to both networks, you need to add static routes, both in the GRE router and in the default gateway on your network.
Example of a static route on the GRE router:
protocols {
  static {
    route 192.168.0.0/24 {
      next-hop 10.0.0.2
    }
  }
}
Keep in mind that the routes must be setup on both sides! Otherwise, packets will not know the return route.