
Here we are ! We now have a root access to the device – which is a good start. But what we were looking at – and our main motivation – is to access to all the sensors/probes/actuators values (in my case – for OpenHAB integration).
Having a root access, I started examining running processes, scripts, applications. The software bundle consists of a common bus – DBus – and multiple services communicating through the bus, all coded in LUA (compiled LUA). The LUA engine is a LUAJIT 2.0.
We will explore 2 different angles to interact with the Cozytouch data.
Option 1 – Interacting with the DBUS
The first thing is to enable the remote access to the bus, using TCP. By default, this is deactivated – for security reasons.
Warning: by doing this, you will introduce a security vulnerability to the CozyTouch as it will expose the DBUS System Bus without authentication. In my case, it is not a problem – the CozyTouch being isolated in my Home Automation airgapped VLAN.
To enable DBUS over TCP, just alter the existing DBUS configuration:
/etc/dbus-1/system-local.conf

Don’t forget that / is mounted as read-only by default. To alter any files, you’ll need to remount the / filesystem with read-write options:
$ mount -o remount,rw /Now that you have access to the System DBUS, the first thing to do is listing of DBUS services:
org.freedesktop.DBus
:1.7
com.overkiz.Application.Mode.Notifier
:1.9
com.overkiz.Application.CloudLink.Status.admin
com.overkiz.Application.UI
com.overkiz.Application.OWS.Plugin.Manager
com.overkiz.Application.Internal.Modules
com.overkiz.Application.Trigger
com.overkiz.Application.Internal.Download
com.overkiz.Application.Internal.Update
com.overkiz.Application.CloudLink.Status.internal
com.overkiz.Application.Trigger.State
com.overkiz.Application.Internal.Modules2
com.overkiz.Delegation.io.action
com.overkiz.Application.Trigger.HomeAutomation.Devices
com.overkiz.Application.Internal
com.overkiz.Application.Internal.Resync
com.overkiz.Delegation.ovp.device
com.overkiz.Application.Mode.Manager
com.overkiz.Application.Lua.HomeAutomation.Protocol.IoHomecontrol
com.overkiz.Delegation.internal.action
com.overkiz.Delegation.io.config
com.overkiz.Delegation.ovp.state
com.overkiz.connman
com.overkiz.Delegation.io.state
net.connman
com.overkiz.Cloudlink.Topic
com.overkiz.Application.Internal.NetworkManager
com.overkiz.Delegation.internal.config
com.overkiz.Application.Lua.HomeAutomation.Protocol.Ovp
com.overkiz.Application.IoHomecontrol
com.overkiz.Application.Io-Homecontrol
com.overkiz.Delegation.io.device
com.overkiz.Application.CloudLink.Status.trigger
fi.w1.wpa_supplicant1
com.overkiz.Delegation.ovp.action
com.overkiz.Application.CloudLink.Status.knowledge
com.overkiz.Delegation.internal.state
com.overkiz.Application.Mode
com.overkiz.Application.Internal.Region
com.overkiz.Delegation.internal.device
com.overkiz.Application.Ovp
com.overkiz.Application.Trigger.Group
com.overkiz.Application.CloudLink.Status.usb
:1.0
:1.1
com.overkiz.Delegation.ovp.config
:1.2
com.overkiz.Cloudlink
:1.4
:1.5
:1.6
The second thing to do is just to listen and sniff the bus – and examining data:
$ dbus-monitor --address "tcp:host=10.0.0.108,port=5000"Periodically, the Bridge receives information (assuming that you have paired some devices with it through the mobile app).
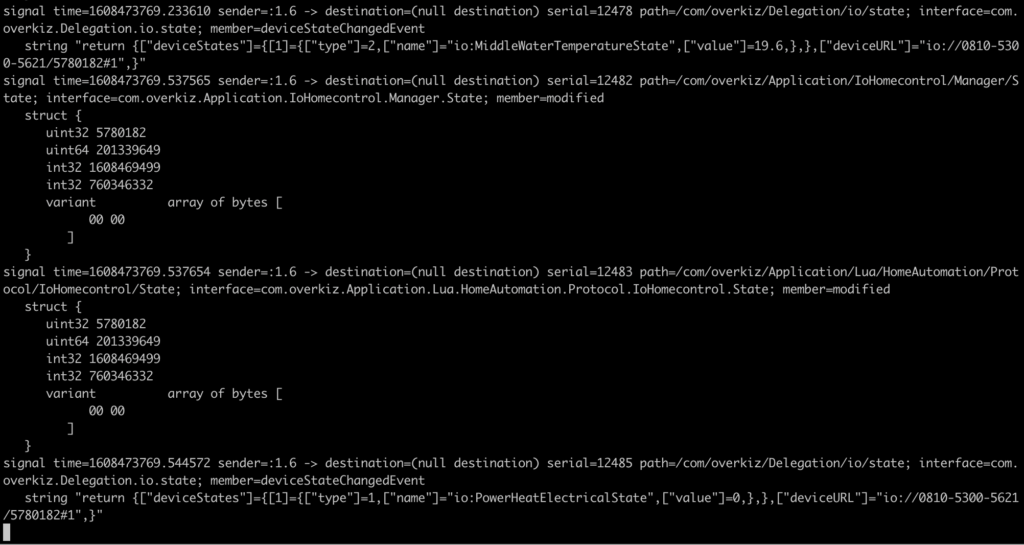
Information is not encrypted – just coded. Reversing the coding will just require some extra reverse-engineering – and more widely – observation.
I chose using simple Python program/script to interact with the DBUS remotely. I will detail later the sensors/actuators capabilities – but keep in mind they only apply to my device (Atlantic AquaCozy).
Option 2 – Enabling the REST API
Having explored the device and reverse-engineering the Compiled LUA code – I figured out that the vendor has coded a REST API – but which is disabled by default. Sad.
The REST API is served by a webserver (lighttpd), which communicates with a LUA daemon over a unix file socket.
Step1: disable un-necessary lighttpd configuration (SSL). To achieve this, just rename /etc/lighttpd.d/ssl.conf to ssl.conf.disabled for example. Why ? Because SSL config needs a certificate & key which are not included, and disabling SSL is quicker than generating a keypair & cert!

Step2: starting lighttd:
$ /etc/init.d/lighttpd startStep3: starting the LUA API Service
$ /usr/bin/luajit /apps/overkiz/local/bin/localdAt this stage, the API is up and running and is accessible at http://<bridge ip>/enduser-mobile-web
Problems:
- we don’t have API documentation
- after few calls, you’ll realize that the API requires authentication (OAuth…)
Regarding the API documentation: decompile the LUA. Multiple LUA decompiles are available on Github. The resulting LUA is not perfect, but provides basics to be able to interact with the API.
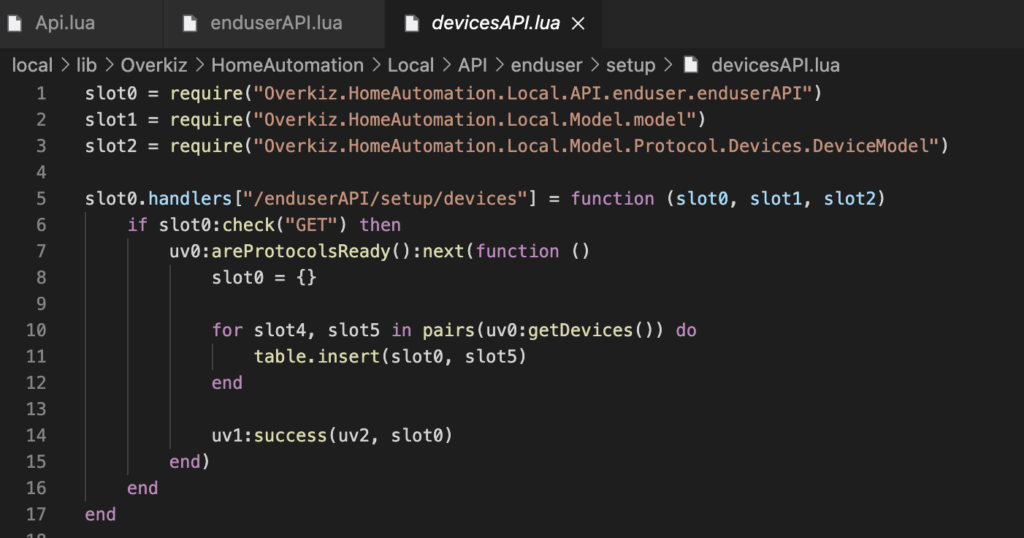
Now – the authentication part. More embarrassing, the code responsible of this is enduserAPI.lua:
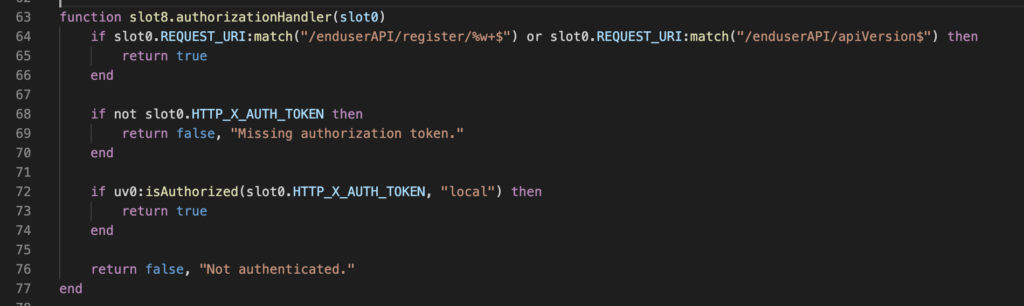
Quickest and simple option, always return true to simulate a successful authentication. Problem: the LUA decompiled is not perfect and cannot be recompiled, it can just be used for reverse-engineering. Our option is patching the compiled LUA (hopefully – no code signature in place).
LUAJIT allows disassembling (pseudo LUA assembler code):
****-****-****:/apps/overkiz/local/lib/Overkiz/HomeAutomation/Local/API/enduser$ luajit -bgl enduserAPI.lua

-- BYTECODE -- enduserAPI.lua:0-0
0001    ISF          0
0002    JMP      4 => 0008
0003    UGET     4   0      ;
0004    MOV      5   4
0005    TGETS    4   4   0  ; "setEvent"
0006    KSTR     6   1      ; "APIClientStillActive"
0007    CALL     4   1   3
0008 => RET0     0   1

......... TRUNCATED ..........

-- BYTECODE -- enduserAPI.lua:0-0
0001    TGETS    1   0   0  ; "REQUEST_URI"
0002    MOV      2   1
0003    TGETS    1   1   1  ; "match"
0004    KSTR     3   2      ; "/enduserAPI/register/%w+$"
0005    CALL     1   2   3
0006    IST          1
0007    JMP      2 => 0015
0008    TGETS    1   0   0  ; "REQUEST_URI"
0009    MOV      2   1
0010    TGETS    1   1   1  ; "match"
0011    KSTR     3   3      ; "/enduserAPI/apiVersion$"
0012    CALL     1   2   3
0013    ISF          1
0014    JMP      2 => 0017
0015 => KPRI     1   2
0016    RET1     1   2
0017 => TGETS    1   0   4  ; "HTTP_X_AUTH_TOKEN"
0018    IST          1
0019    JMP      1 => 0023
0020    KPRI     1   1
0021    KSTR     2   5      ; "Missing authorization token."
0022    RET      1   3
0023 => UGET     1   0      ;
0024    MOV      2   1
0025    TGETS    1   1   6  ; "isAuthorized"
0026    TGETS    3   0   4  ; "HTTP_X_AUTH_TOKEN"
0027    KSTR     4   7      ; "local"
0028    CALL     1   2   4
0029    ISF          1
0030    JMP      2 => 0033
0031    KPRI     1   2
0032    RET1     1   2
0033 => KPRI     1   1
0034    KSTR     2   8      ; "Not authenticated."
0035    RET      1   3

......... TRUNCATED ..........
Reading a bit of LUA specifications (here or here for example), we learn that in LUA, the bool values are different from other languages:
- 0 means nil (null, not set)
- 1 means false
- 2 means true
Our function ends with instruction “RET 1 3”, which means returning the value which resides in “slot 1”. The slot 1 value is set 2 lines before, “KPRI 1 1”, which means value 1 (FALSE) is put in “slot 1”. What we just need to do is to replace this instruction by “KPRI 1 2”, in disassembly line 0033.
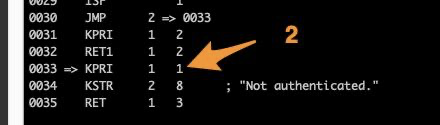
Unfortunately, once again, we cannot just alter the assembly code and re-assemble it. Not supported by LUAJIT. We will has such using an hex editor, and replace the value.

No miracle method to do that: multiple attempts to edit the files, and locate the right place, being assisted by LUA specs/docs. Fortunately, the LUA file is also small – which helps. You can also assist yourself with STRINGS (“not authenticated” for example, which are stored at the end of the function).
After patching the enduserAPI.lua, the daemon can be restarted, and the API used:
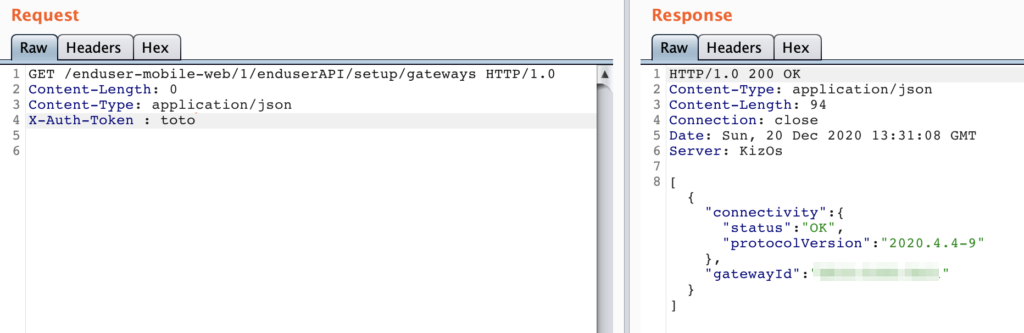
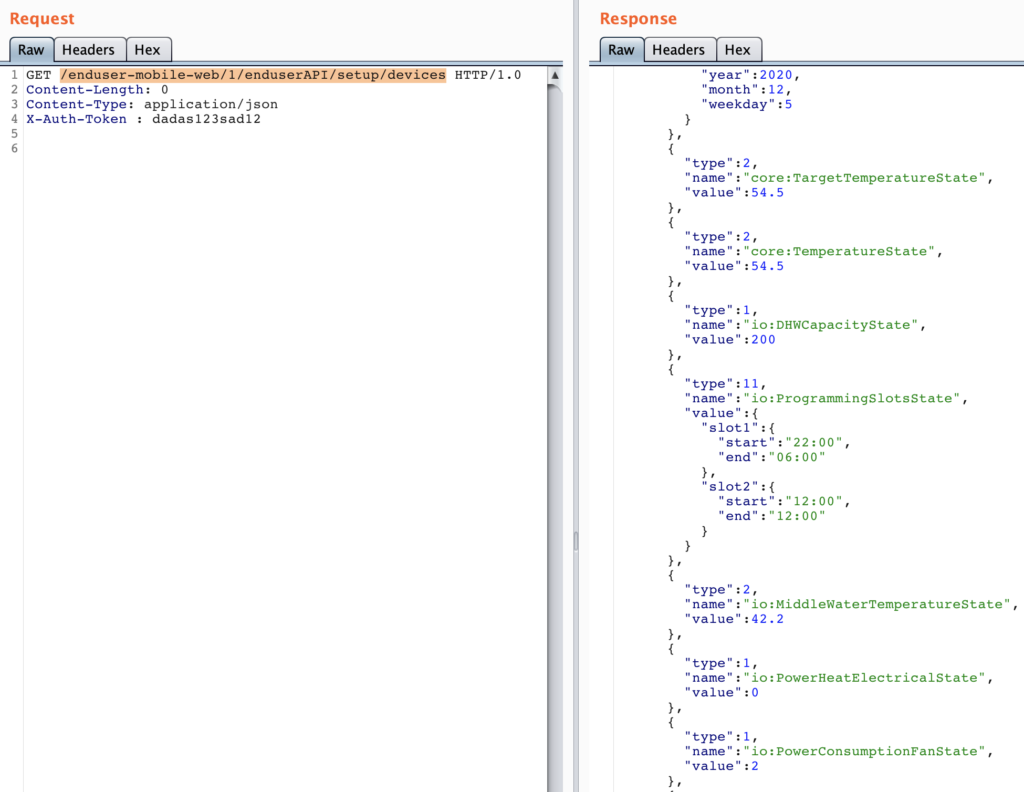
NB: you still need to provide the “X-Auth-Token” header, but the value is not checked.
Here are some API endpoints useful:
[GET] /enduser-mobile-web/1/enduserAPI/setup/devices
[GET] /enduser-mobile-web/1/enduserAPI/setup/gateways
[GET] /enduser-mobile-web/1/enduserAPI/setup/devices/<device internal URL>/states where “<device internal URL>” is URL encoded!
You should now have sufficient help to implement the missing part between your CozyTouch and your homeautomation system !
Very great work ! It’s possible to download for root firmware ?
Thx
Hello,
I’ve not yet had time to try to dump the FW – but this is on my list 🙂
The IO-Homecontrol community is looking forward to get FW dump, it’s anoying that they sell products which are not kompatible with other IO-Homecontrol products!
Beau boulot, dommage pour le firmware, il aurait aidé pour la partie radio (et particulièrement ce qui concerne la carte I2G des radiateurs thermor)
Incredible !
Congratulations !
Wooo amazing, thank you for all steps! I have a Cozytouch in my hands (and knowledges to reproduce your tutorial, only missing time for the moment!). Finally, how do you interact with the local bridge, DBUS or API? Can you post your ‘client’ side script/api in the OpenHAB? Even raw/dirty inputs will be very helpfull, thanks a lot again for this incredible work!
I no longer use this setup – but I had done both DBUS client – handling DBUS event and pushing them to an mqtt broker and the local API.
Here is some code for the DBUS client:
import dbus

from gi.repository import GLib

from dbus.mainloop.glib import DBusGMainLoop

import paho.mqtt.client as mqtt

from datetime import datetime
"""
For Mac Install:
$> brew install dbus pygobject3 gtk+3
$> pip3 install --user dbus-python
"""
MQTT_BROKER = ""
MQTT_TOPIC = "ioHomeControl/"
MQTT_CLIENT = "iohomecontrol"
BUS_ADDRESS = "tcp:host=10.0.0.108,port=5000"
BROKER_USER = ""
BROKER_PASS = ""
def log(s):
now = datetime.now()
current_time = now.strftime("%H:%M:%S")
print(current_time + ' - ' +s)
def connectBroker():
global client
client = mqtt.Client(MQTT_CLIENT)
client.username_pw_set(BROKER_USER, BROKER_PASS)
client.connect(MQTT_BROKER)
def disconnectBroker():
global client
client.disconnect()
def publish(topic,msg):
global client
connectBroker()
client.publish(topic, msg)
disconnectBroker()
def SondeAirEntrant(src, data):
temperatureActuelle = (data[0] * 0x100 + data[1]) / 10.
temperatureMax = (data[4] * 0x100 + data[5]) / 10.
log("T° air entrant: " + str(temperatureActuelle) + " - T° Max: " + str(temperatureMax))
publish(MQTT_TOPIC + str(src) + "/temperatureAir", "{ \"temperatureAir\" : " + str(temperatureActuelle) + " }")
def DureeFonctionnementPacEtElec(src, data):
pass
def TiRunTotal(src, data):
tempsELEC = (data[2] * 0x100 + data[3])
tempsPAC = (data[0] * 0x100 + data[1])
log("Temps fonctionnement ELEC: " + str(tempsELEC) + " - PAC: " + str(tempsPAC))
def SondeEauChaude1(src, data):
temperatureActuelle = (data[0] * 0x100 + data[1]) / 10.
temperatureMax = (data[4] * 0x100 + data[5]) / 10.
log("T° eau: " + str(temperatureActuelle) + " - T° Max: " + str(temperatureMax))
publish(MQTT_TOPIC + str(src) + "/temperatureEau", "{ \"temperatureEau\" : " + str(temperatureActuelle) + " }")
def default(src, data):
pass
def ignored(src, data):
pass
def Mode(src, data):
# 1 : MANUEL
# 0 : AUTO
mode = "auto" if data[0] == 0 else "manuel"
log("Mode: " + mode)
publish(MQTT_TOPIC + str(src) + "/Mode", "{ \"mode\" : \"" + mode + "\" }")
def Consommation(src,data):
pass
def ModeBoost(src,data):
boost = True if data[0] == 1 else False
log("Boost: " + str(boost))
publish(MQTT_TOPIC + str(src) + "/Boost", "{ \"boost\" : \"" + str(boost).lower() + "\" }")
def Erreurs(src,data):
pass
def Absence(src,data):
absence = True if data[0] == 1 else False
log("Absence: " + str(absence))
publish(MQTT_TOPIC + str(src) + "/Absence", "{ \"absence\" : \"" + str(absence).lower() + "\" }")
def CreneauxProg(src,data):
pass
def EtatsActionneurs(src,data):
#log("Etats actionneurs: " + src(data))
pass
def PowerHeatElec(src,data):
pass
def SondeEvaporateurHaut(src,data):
pass
def EtatCommunicationInverter(src,data):
pass
def SondeRefoulementCompresseur(src,data):
temperatureActuelle = (data[0] * 0x100 + data[1]) / 10.
temperatureMax = (data[4] * 0x100 + data[5]) / 10.
log("T° sortie compressuer " + str(temperatureActuelle) + " - T° Max: " + str(temperatureMax))
publish(MQTT_TOPIC + str(src) + "/SortieCompresseur", "{ \"temperature\" : " + str(temperatureActuelle) + " }")
def SondeEvaporateurBas(src, data):
pass
def PowerElecTotal(src, data):
pwrElecTotal = (data[0] * 0x100 + data[1])
log("Power Elec Total: " + str(pwrElecTotal))
publish(MQTT_TOPIC + str(src) + "/PowerElecTotal", "{ \"power\" : " + str(pwrElecTotal) + " }")
def PowerHeatPump(src, data):
pwrHeatPump = (data[0] * 0x100 + data[1])
log("Power Heat Pump: " + str(pwrHeatPump))
publish(MQTT_TOPIC + str(src) + "/PowerHeatPump", "{ \"power\" : " + str(pwrHeatPump) + " }")
def value_switcher(code):
switcher = {
201332481 : SondeEauChaude1,
201327361 : DureeFonctionnementPacEtElec,
201333249 : SondeAirEntrant,
201337345 : TiRunTotal,
201328129 : Mode,
201327617 : Consommation,
1878000903 : ignored, # Force Transmission (WRITE)
65547 : ignored, # Functional Parameter 10
65552 : ignored, # Functional Parameter 15
65553 : ignored, # Functional Parameter 16
65537 : ignored, # MpFpRefreshManager
16830720 : ignored, # AliasTargetOnMP
2146500638 : ignored, # UNKNOWN
201326593 : ModeBoost,
201327105 : Erreurs,
201327873 : Absence,
201329409 : CreneauxProg,
201335041 : EtatsActionneurs,
201339649 : PowerHeatElec,
201339905 : PowerHeatPump,
201333761 : SondeEvaporateurHaut,
201333505 : SondeEvaporateurBas,
201338881 : EtatCommunicationInverter,
201334017 : SondeRefoulementCompresseur,
201339393 : PowerElecTotal,
201329665 : ignored, # ./io-homecontrol/lib/Overkiz/HomeAutomation/Protocol/IoHomecontrol/Parameter/Private/Atlantic/ECS/AntiLegionnelle.lua
201330177 : ignored, # ./io-homecontrol/lib/Overkiz/HomeAutomation/Protocol/IoHomecontrol/Parameter/Private/Atlantic/ECS/AppointElectrique.lua
201330433 : ignored, # ./io-homecontrol/lib/Overkiz/HomeAutomation/Protocol/IoHomecontrol/Parameter/Private/Atlantic/ECS/DateHeureEcs.lua
201334785 : ignored, # ./io-homecontrol/lib/Overkiz/HomeAutomation/Protocol/IoHomecontrol/Parameter/Private/Atlantic/ECS/EtatsEntrees.lua
201337601 : ignored, # ./io-homecontrol/lib/Overkiz/HomeAutomation/Protocol/IoHomecontrol/Parameter/Private/Atlantic/ECS/NrjFan.lua
201338113 : ignored, # ./io-homecontrol/lib/Overkiz/HomeAutomation/Protocol/IoHomecontrol/Parameter/Private/Atlantic/ECS/CompteurFiltre.lua
201338369 : ignored, # ./io-homecontrol/lib/Overkiz/HomeAutomation/Protocol/IoHomecontrol/Parameter/Private/Atlantic/ECS/RatioFiltre.lua
201340161 : ignored # ./io-homecontrol/lib/Overkiz/HomeAutomation/Protocol/IoHomecontrol/Parameter/Private/Atlantic/ECS/ModeRegulation.lua
}
func = switcher.get(code)
if func is None:
log("[!] Unsupported message type: " + str(code))
return default
return func
def signal_handler(*args, **kwargs):
if isinstance(args[0], dbus.Struct):
# print("[+] Struct!")
struct = args[0]
device = struct[0]
characteristic = struct[1]
value_switcher(characteristic)(device,struct[4])
print("[*] Dbus -> MQTT")
connectBroker()
DBusGMainLoop(set_as_default=True)
bus = dbus.bus.BusConnection(BUS_ADDRESS)
print("[*] Connected to DBus!")
bus.add_signal_receiver(signal_handler,
bus_name='com.overkiz.Application.IoHomecontrol',
interface_keyword='interface',
member_keyword='member',
path_keyword='path',
message_keyword='msg')
loop = GLib.MainLoop()
loop.run()